Una incursión momentánea y a ratos libres sobre lo que es la técnica del Photoshop , sus atajos, sus acciones, sus herramientas, sus plugins ... y tantas y tantas cosas que hay que dominar de esta Bestia !!! ... y una incursión momentánea también sobre otros temas fotográficos: galerias de fotógrafos, técnicas fotográficas, novedades ... y un largo etcétera !!!.

POLITICA DE PRIVACIDAD

Todas las fotos y artículos que aparecen en este blog están sacados de sitios públicos en Internet. Si usted es propietario de alguna/s de estas fotografías o artículos y no quiere que aparezcan aquí o quiere que se le nombre como autor de la/s misma/s por favor póngase en CONTACTO con el autor de este blog para su eliminación o reseña de immediato. Nuestra intención es en lo posible NO vulnerar los derechos de autor a que están sometidas algunas de estas obras. Gracias por su comprensión.

miércoles, 24 de febrero de 2010

RETOCANDO UNA FOTO DE ESTUDIO

Este tutorial está en inglés (bueno, este y muchos otros que irán saliendo más adelante) aunque se entiende bastante bien (y sino siempre tienes los traductores online que te facilitan en la medida de lo posible la ardua tarea de la traducción).
Aún así aviso, este tutorial está pensado para usuarios expertos en Photoshop, muestra unas técnicas únicas para retoque fotográfico.

¿Adelante?

Pués vamos allá con el

ANTES Y EL DESPUES:
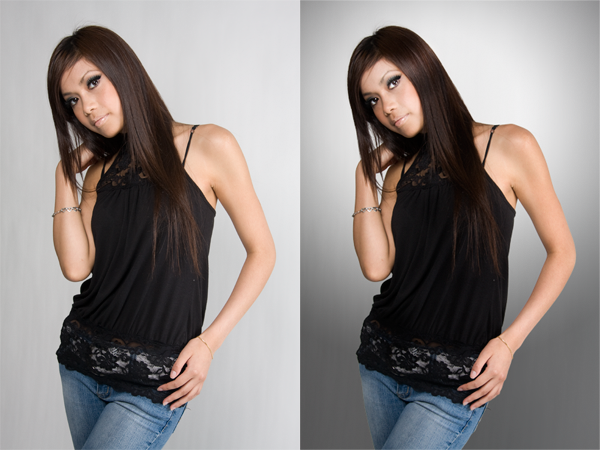
image


Retouching a Studio Portrait Photoshop Tutorial

Retouching the background

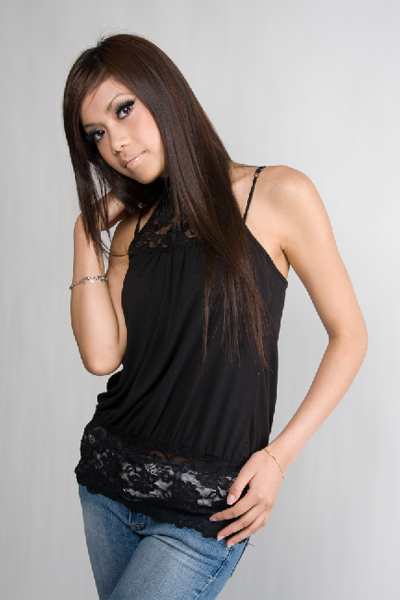
Here is the original image. As a photo it looks fine but it looks flat and boring. This Photoshop tutorial will show you techniques used to make the photo have a stronger impact. You can follow this tutorial with one of your own image or you can use the image below:
image

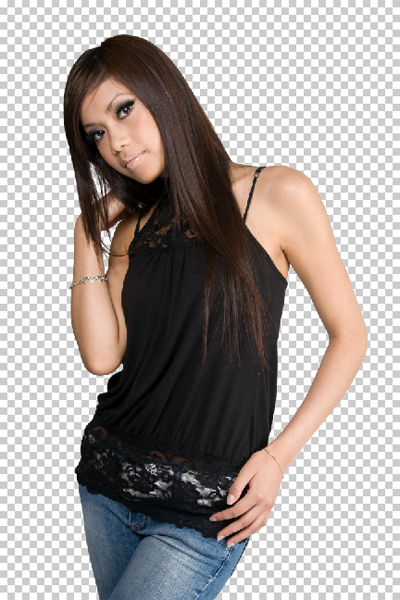
Creating the mask

The first step is to isolate the model from the background. I used the extract and color range tool to create this. First I used the extract tool (Filter > Extract) but it didn’t work very well for the hair.
image

I then use the color range tool (Select > Color Range) to select the areas that were hard to extract using the extract tool.
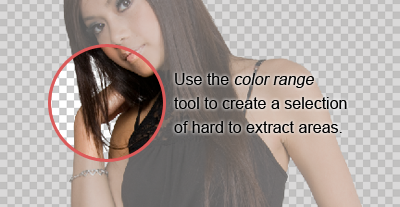
image

Now we have a mask in it’s own layer.

image


Adding a gradient to the background

With the mask created, I can add a gradient to the background. Adding a gradient to the background is a simple and effective way to enhance a boring background. Here is a preview of what the layers will look like in the end.
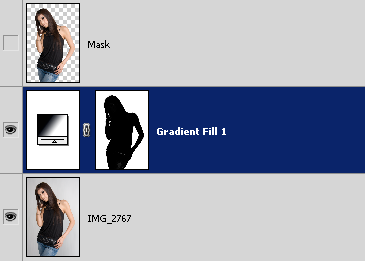
image

To create a gradient background, we’ll be adding a gradient fill layer using the mask that we just created. To do that, hold down the Ctrl key and click on the layer thumbnail of the layer “Mask”. It will load the selection of the layer. Choose Select > Inverse to inverse the selection. Then, choose Layer > New Fill Layer > Gradient.
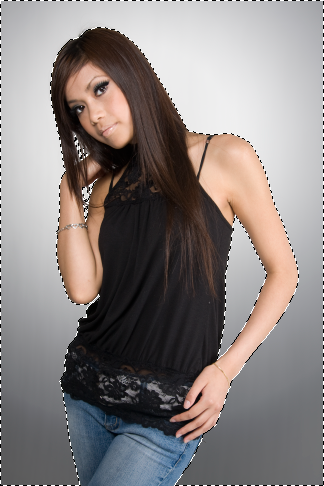
image

In the Gradient Fill tool, move the center of the gradient behind the head. You can do this by clicking and dragging on the document window.
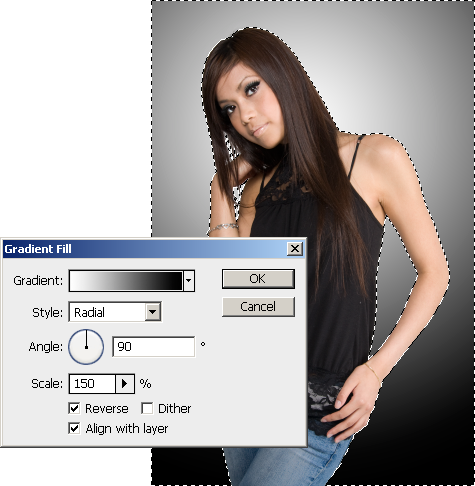
image

To increase contrast, you can change the gradient so that it is like the image below.
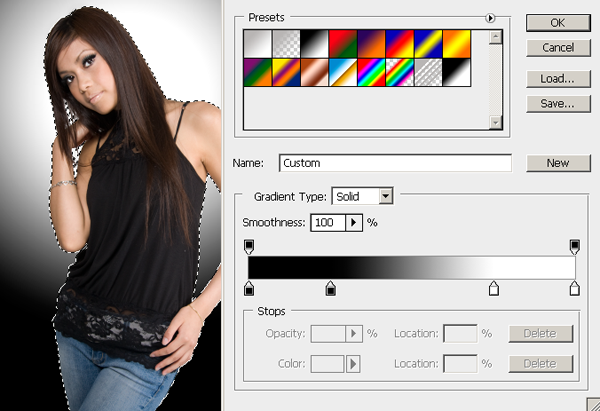
image

Finally, adjust the opacity of the Gradient Fill layer. I set mine to 50% opacity.
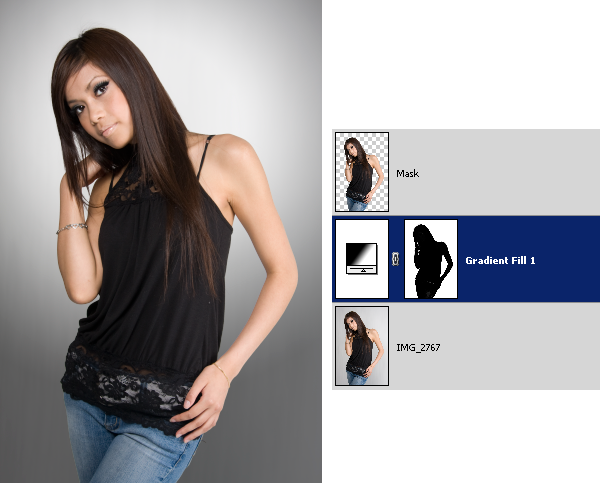
image


Tone

Begin by creating a new layer for dodging and burning. Position the layer above the gradient fill adjustment layer. Then, change the blending mode to soft light.
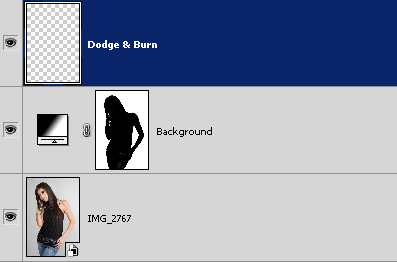
image

Choose Edit > Fill and use the settings below. image
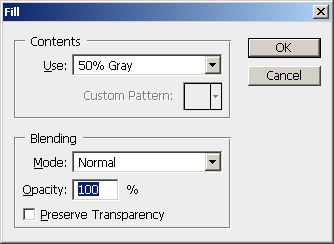
The layer should now be filled with a 50% gray.
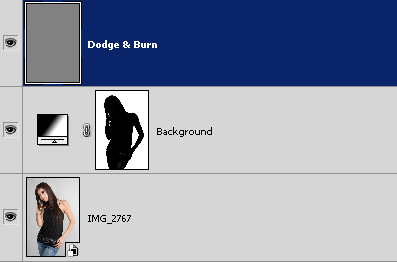
image

Add a layer mask using the shape from the Mask layer. Hold down the Ctrl key and click on the layer thumbnail of the Mask layer . Then, click on the image in the layers palette to add a layer mask.

image

Click back on the 50% gray layer thumbnail and use the dodge and burn tools. For the image below, I used the burn tool to darken the models right side of the face, hair, top, and her arms. Then, I use the dodge tool to brighten the other side of the models face.
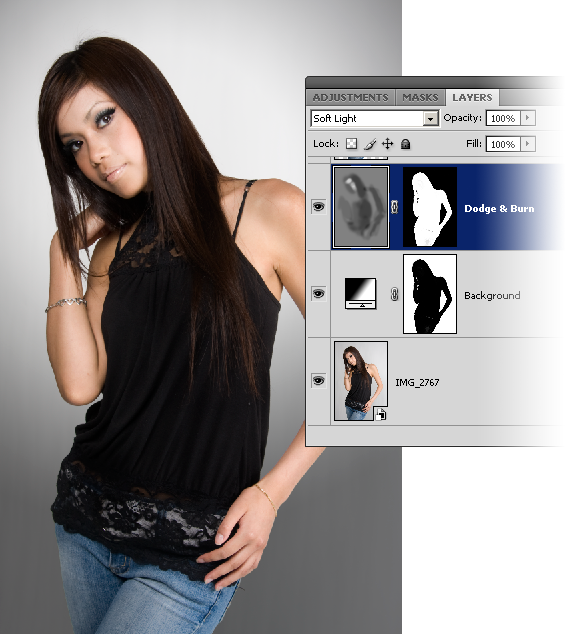
image

Here is a before and after effect of the dodging and burning.
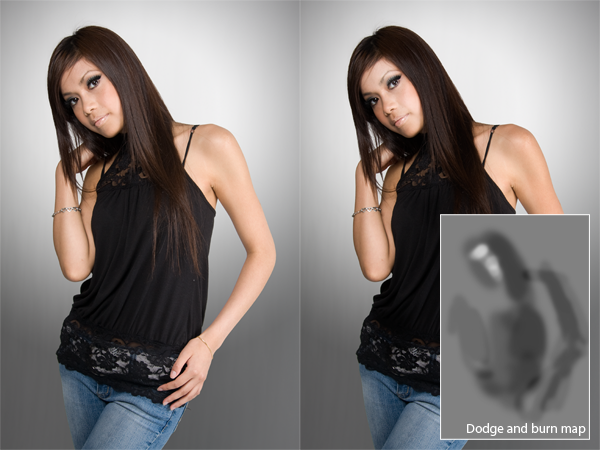
image


Eye Brightening

Brightening the eyes will have a dramatic effect. It can be easily done by using a Brightness/Contrast adjustment layer. Choose Layer > New Adjustment Layer > Brightness/Contrast to add a new Brightness/Contrast adjustment layer. Rename this layer to Brighten Eyes.
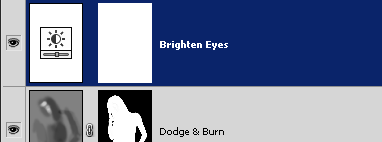
image

For now, set the brightness to 50 and contrast to 33.
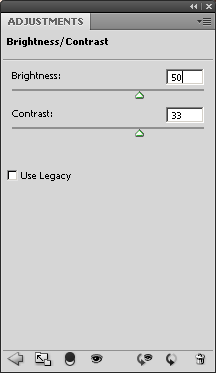
image

Select the layer mask and choose Image > Adjustments > Invert. This will invert the layer mask from white to black.
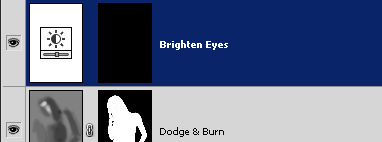
image

Using the brush tool, paint the layer mask where the eyes are. You should see the eyes brighten as you paint. Then, go back into the Brightness/Contrast settings and readjust the settings.
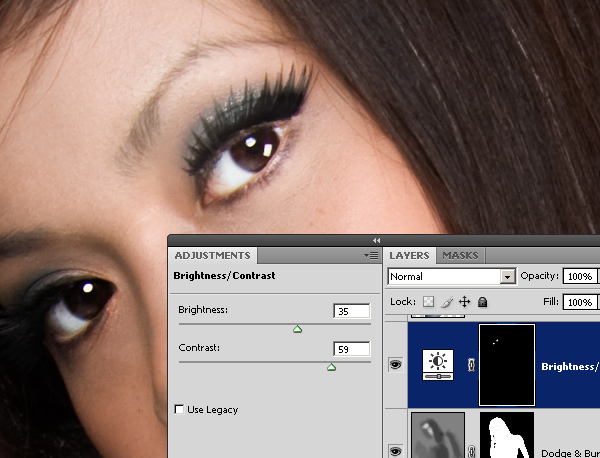
image


Hair Shine

Finally, we’ll add a shine to the hair. Start by using the quick selection or magic wand tool to create a selection of the hair around the area where you want the shine to appear.
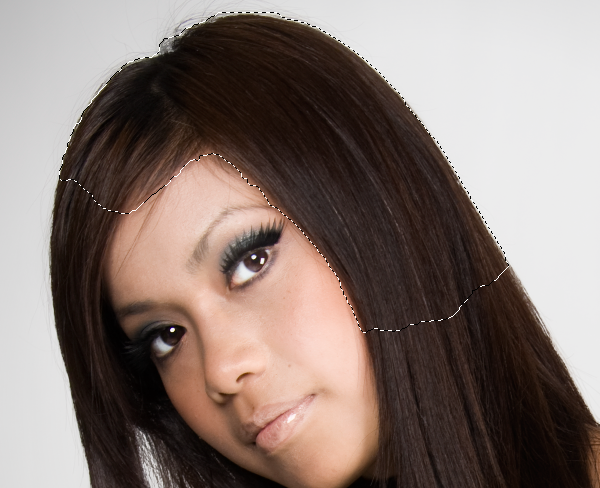
image

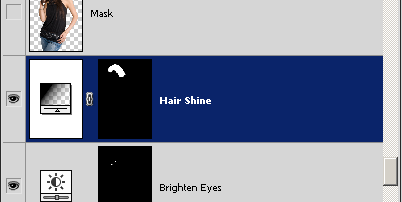
With the selection, choose Layer > New Fill Layer > Gradient. Position the layer above the Brighten Eye layer. Change the blending mode of the Hair Shine layer to overlay. You should have a layer like the image below.
image

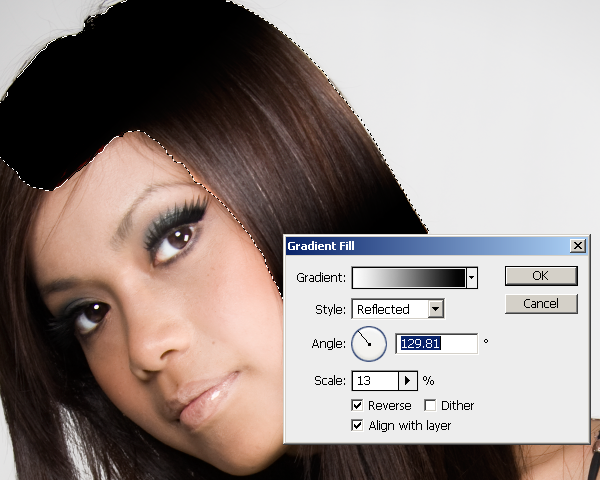
Go back into the Gradient Fill settings. Set the gradient to white to black and style to reflected. Checkmark the reverse option then click and drag on the document window and position the gradient where you want the hair shine to appear. Adjust the scale.
image

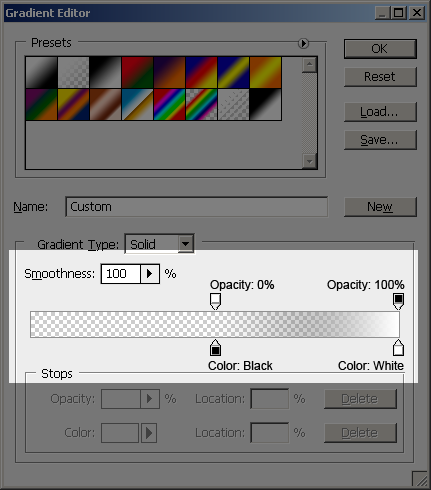
In the Gradient Fill window, click on the gradient to edit it. You should have a window like the image below. Create a gradient like the image below. To do this, click and drag the top left input slider to the middle of the gradient bar. Do the same with the bottom left input slider. Then, click on the individual input sliders and adjust the settings as shown in the image below.image
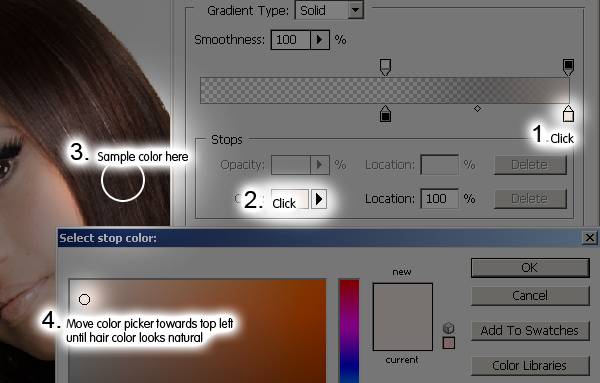
We now have a hair shine but it does not match the color of the hair. We’ll add back a little of the hair color to the shine.

  1. Click on the bottom left input slider.
  2. Click on the color setting and a color picker window will appear.
  3. Click on the hair to capture the color of the hair.
  4. Move the color picker towards the top left until the hair color looks natural.
  5. Click OK three times to exit out of the gradient settings.
image

We have added the hair shine but if you look closely, you can see some artifacts.
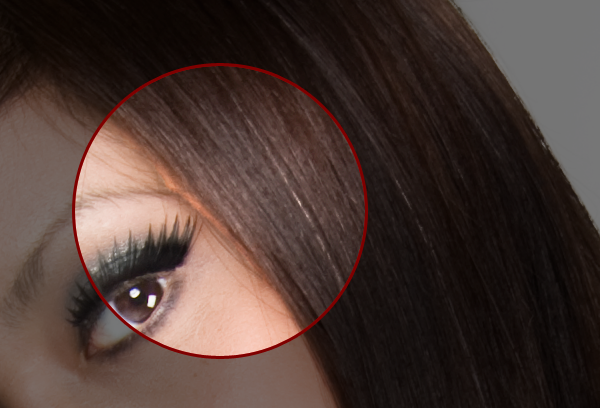
image

We can easily fix this by blurring the layer mask. Select the Hair Shine layer mask then choose Filter > Blur > Gaussian Blur. Adjust the settings until the unclean edge fades.
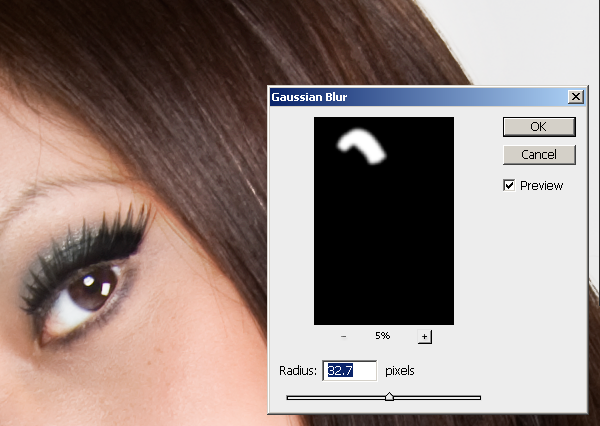
image

If the hair shine is overlapping the skin, use the Minimum filter to hide it. Choose Filter > Other > Minimum and adjust the slider.
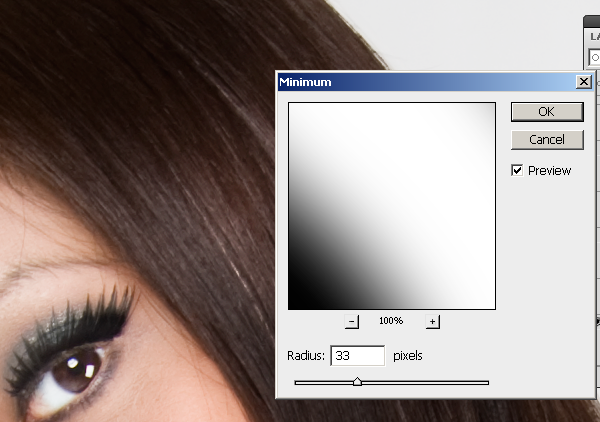
image

Here is the before and after effect of adding hair shine. You can add emphasis to the eyes by aligning the hair shine with the eyes.
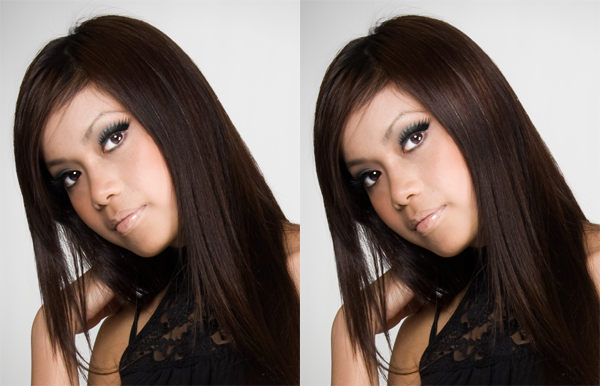
image


Final Results

image

image

No hay comentarios:

Publicar un comentario

Archivo del blog

Seguidores

Visitas

Etiquetas

2007 (1) 2009 (2) 2011 (1) acciones (2) action (2) actor (1) ads (2) advertising (5) aerea (4) aerial (4) africa (2) agua (2) albena markova (1) aleksey marina (1) alemania (1) american photo images (1) amor (3) amsterdam (1) andrew zuckerman (1) andris eglitis (1) angeles times (1) animal (11) anuncios (8) aphoto (10) aplicaciones (1) architecture (1) army (1) arnaud frich (1) arquitectura (1) asia (1) auto (5) avatar (1) aves (1) awards (3) azul (1) back light (1) backgrounds (1) baile (1) barcelona (1) bianca balti (1) bibble (1) bill wadman (1) birds (2) black and white (11) blanco y negro (11) blue (1) boat (1) boda (4) bodas (1) bodegón (8) body paint (2) botellas (1) bottles (1) bp (1) bride (3) brushes (12) bull (1) buque (1) butterfly (1) caballos (1) calendario (3) camión (1) capilla (1) car (4) caratula (1) carrusel (1) cartoon (1) cascada (2) casino (1) castells (1) castillos (2) cat (3) celebrities (1) cementerio (1) cemetery (1) cepillos (1) chateaux (1) children (6) china (1) chino (1) christmas (5) church (1) cielo (1) cindy grundsten (1) circo (1) cirque (1) city (2) ciudad (2) claudia (1) clipart (1) close-up (2) coche (7) colby brown (1) collage (3) collin bogle (1) color (4) colores (2) comic (1) composición (1) conceptual (2) contraluz (1) cookie (1) corán (1) corazón (1) corel (2) cosplay (3) couples (1) creative (11) croacia (1) crucero (1) cs5 (1) cuba (1) cuerpo humano (2) curso (3) dale chihuly (1) dan vojtech (1) dance (1) david lachapelle (1) david leventi (1) deporte (8) desierto (1) design (3) desnudo (22) deutchland (1) devianart (3) dirk wiedlein (1) diseño (3) disney (1) dog (2) dominik kraner (1) douglas latham (1) dreamweaver (1) drew gardner (1) dvd (4) dzoom (1) earth (6) ebooks (2) editor (2) eeuu (2) efecto seda (1) egipt (1) egipto (1) eldar kadimov (1) emoticonos (1) eps (2) eric rousset (1) escocia (1) españa (2) estatua (1) estilo (2) estudio (1) eyes (2) faros (1) fashion (2) felix (1) fifa (1) fight (1) film (1) filter (1) filtro (1) fire (4) fish eye (1) flickr (2) flores (11) flowers (11) fonts (7) football (3) foto antigua (1) foto manipulación (6) fotomix (29) frame (1) france (4) francia (4) fruit (1) fruta (1) fuego (3) fuentes (4) fun (2) futbol (3) gala gankina (1) galerias (1) galletas (1) games (1) gato (3) gene higa (1) gente (4) getty images (12) glamour (1) glass (1) gore (1) graffiti (1) granada (1) grunge (1) guerra (1) haiti (1) halloween (1) hawai (1) hdr (7) henryk (1) hermin abramovitch (1) hollywood (1) holy week (1) hombre (1) horror (2) horses (1) howard schatz (1) human body (2) humo (1) humor (1) iglesia (1) iliko studio (1) iluminación (1) ilustración (1) ilustration (1) india (1) infrared (1) infraroja (1) international (1) invierno (5) islandia (1) italia (1) japan (5) japón (5) jerry skarbakka (1) joy of life (2) kids (1) kilauea (1) lady gaga (1) laini (1) landscape (22) larisa dydorovs (1) las vegas (1) latvia (1) lava (1) layer (1) lego (1) leica (1) letonia (1) light effect (2) lighthouses (1) lighting (1) liliya gorlanova (1) lince (1) linx (1) livejournal (1) lluvia (1) loira (1) loire (1) london (1) londres (1) love (2) luz (2) macro (15) manga (1) map (1) mapa (1) mar (10) marc adamus (1) marca (1) marco (1) maria (1) mariposa (1) marruecos (1) martin loyer (1) mascotas (5) matte painting (2) mattijn franssen (1) medieval (1) megafotografia (1) megaupload (1) metro (1) méxico (1) mezquita (1) michael kai (1) michel gantner (1) micro (4) miss (1) moda (1) model (6) modelo (6) momento (1) moscow (3) moscú (3) mujer (5) mundo (6) munich (1) murat suyur (1) musulmán (1) nasa (1) naturaleza (34) nature (33) navidad (5) nevada (1) new york (1) newsletter (1) night (1) nikon (1) niños (6) nocturna (1) norbert maier (1) novia (3) nude (22) nueva york (1) ocean (3) oil (1) ojo de pez (1) ojos (2) ondas (1) opera (1) otoño (1) oxana zuboff (1) paisaje (21) pájaro (1) panorámica (2) paris (6) parque (1) pasarela (1) patterns (1) pdf (2) pearcing (1) peleng (1) película (2) people (4) perro (2) personalidades (1) perú (1) pesebre (1) pet (5) peter coulson (1) photo editor (4) photo manipulations (5) photofunia (1) photography (1) photomatix (1) photomix (31) photoshop (85) photosight (1) picture (1) pin-up (2) pinceles (11) pinguino (1) pirelli (2) plantillas (3) playa (1) playstation (1) plugin (7) png (1) polaroid (1) portrait (21) powerful mental wave (1) primavera (1) programas (3) psd (4) publicidad (2) pxleyes (1) race (1) rain (2) rapidshare (1) raptor (1) raw (1) rayos x (1) red (4) reglas (1) renault (1) repair (2) reparar (2) retoque (2) retouch (3) retrato (21) reus (1) reuters (3) robado (1) rojo (2) roma (2) rules (1) rusia (9) salou (1) salvaje (2) samin (1) san fermin (1) san petersburgo (2) sand (1) santa (1) scotland (1) scott peck (1) scratches (1) sea (8) seda (1) semana santa (1) sergei bezyaev (1) sexual (1) simon hogsberg (1) skeletalmess (1) sky (1) smileys (1) smoke (1) software (2) sony (1) spain (1) splash (1) sport (9) spots (1) spring (1) st.petersburg (1) statue (1) steve mc.curry (1) still life (10) storm (2) street (2) studio (3) styles (1) sudafrica (1) summer (1) surf (2) tattoo (1) tchaikovski artem (1) tears (1) templates (3) terror (2) terry richardson (1) texturas (4) textures (4) tierra (3) tiger (1) tigre (1) tokyo (2) tombuctú (1) tools (1) tormenta (2) toros (1) torres (1) tortazos (1) travel (1) trucks (1) ttf (2) tunel (1) tutorial (21) underawater (1) urban (1) valentin (5) vancouver (1) vaticano (1) vector (3) verano (1) viaje (1) vida (1) video (4) vidrio (1) vilaseca (1) viona iegelems (1) vladimir fedokto (1) volcan (2) volvo (1) wallpaper (21) wallpapers (1) war (1) water (3) waterfall (2) watermark (1) webs (2) wedding (5) whnpa (1) wild (12) winter (5) woman (6) world (6) x-ray (1) zombie (2) zoo (1)

Datos personales

Mi foto
Fotógrafo aficionado, Puedes ver mis trabajos aquí ... www.josepmaria10.mye.name o también aquí ... www.pinterest.com/tivisano/ . Dispongo de equipo fotográfico profesional así como de un estudio portatil. Si quieres saber más sobre mis sesiones fotográficas, no lo dudes, contacta conmigo a través de un mensaje privado a visualsjm@gmail.com

Mis otros BLOGS

Uno de mis otros blogs y SOLO con fotografías propias (de libre uso nombrándome como autor de las mismas y sino es con ánimo comercial) ... www.lafotografiadejosepmaria.blogspot.com

Otro de mis blogs, esta vez con más cositas cuando mi tiempo libre me lo permite, noticias, fotos de mi autoria, tutoriales, etc. ... Mi fotoblog

La Banda Sonora de este BLOG


ir arriba