Una incursión momentánea y a ratos libres sobre lo que es la técnica del Photoshop , sus atajos, sus acciones, sus herramientas, sus plugins ... y tantas y tantas cosas que hay que dominar de esta Bestia !!! ... y una incursión momentánea también sobre otros temas fotográficos: galerias de fotógrafos, técnicas fotográficas, novedades ... y un largo etcétera !!!.

POLITICA DE PRIVACIDAD

Todas las fotos y artículos que aparecen en este blog están sacados de sitios públicos en Internet. Si usted es propietario de alguna/s de estas fotografías o artículos y no quiere que aparezcan aquí o quiere que se le nombre como autor de la/s misma/s por favor póngase en CONTACTO con el autor de este blog para su eliminación o reseña de immediato. Nuestra intención es en lo posible NO vulnerar los derechos de autor a que están sometidas algunas de estas obras. Gracias por su comprensión.

lunes, 8 de febrero de 2010

UN TATUAJE EN POCOS PASOS

En este tutorial se usa una técnica avanzada para lograr un tatuaje realista, en Internet circulan varios tutoriales con este tema pero no logran imágenes tan realistas como en este.

Como en otras ocasiones, explicado en Inglés pero ya se sabe, a buen entendedor, pocas palabras bastan.

El tutorial:

Step 1

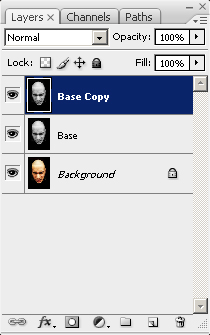
Ok, open up your stock image and duplicate it by clicking on the layer and dragging it to the New Layer icon down the bottom (it's the one to the left of the trash can). Name this layer Base, desaturate it (Ctrl+Shift+U) and duplicate it again. The reason I am doing this is that I like to have multiple stages of my base image, just in case I mess up, so that I can come back at any given time and fix errors.

Step 2

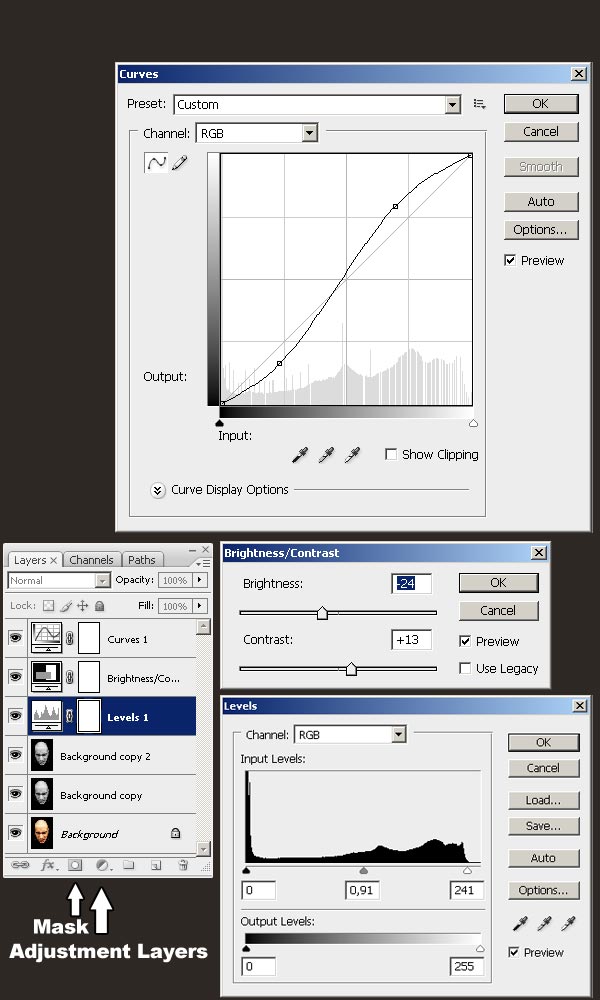
Time to prepare our image. I really want to bring out the detail in the skin, so I am going to up the contrast and adjust the tones a little bit. Let's add three adjustment layers: First, a Levels layer, then a Brightness/Contrast layer, and last a Curves layer. You can add each by going to Layer > New Adjustment Layer > Levels/Brightness/Curves depending on which you're adding. Adjustment layers allow you to change the properties of the image below without actually destroying or changing image data.

Step 3

The well known 'S-shape' in the curves layer enhances contrast but may have a downside. As you can see, some parts of the stock are affected heavily by the light. These parts include the forehead and parts of the cheeks. The curves layer can make these parts too light and eliminate their detail. To solve this, you need to apply a layer mask to the curves layer and brush up those parts.

You can do this by going to your layers palette, clicking on the curves layer, then down the bottom clicking on the button third from the left to add a Layer Mask. Once you've added a layer mask, you'll see an extra mask clipped on to the layer. Click on that mask, and then using a softish brush gently paint black over the areas where you do not want the curves layer to show through. Remember that when you add a layer mask, white lets the layer show through and black hides it.

Step 4

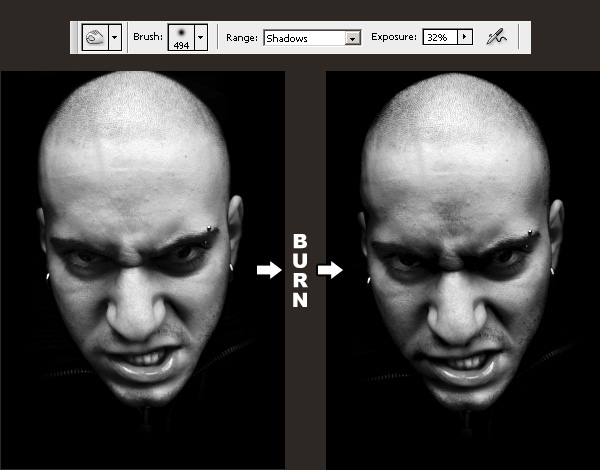
I was not all too happy with what I had, so I decided to use the Burn Tool (O) to touch up the image manually. I used a large, soft brush and set the range to Shadows with an Exposure of 32% (shown)

Now go to Layer>Flatten Image and save the file as Displacement.psd. DO NOT CLOSE THE FILE, as you will lose everything. Hit Ctrl+Z to undo the 'Flatten Image' command and now go to File > Save As and save the file as Tattoo.psd or any other name apart from Displacement.psd

We will be using the Displacement.psd file as a displacement map. Therefore we shouldn't edit it any further, and any change we apply to our image from now on will be saved into the Tattoo.psd file. Ok, on to the fun part...

Step 5

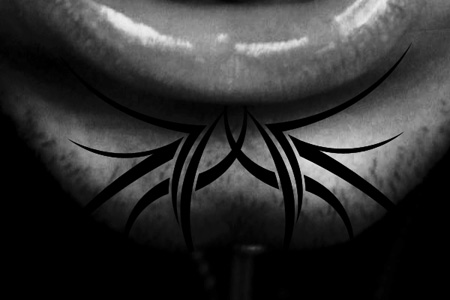
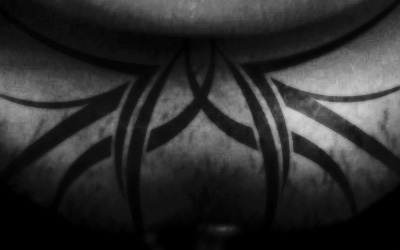
Now that we've finished prepping our image, we can finally start applying the tattoo. Open up your Gomedia free vectors file in Illustrator (preferably, but you can also open it in Photoshop). Copy and paste a design of your choice onto the face. Rotate it and adjust it accordingly, so that it fits more or less. Mask out any parts that should not appear to have a tattoo on them. In my case these are the lips. Rename the layer to 'Tattoo' so that you can find it easier. Close the vector eps file and do not save the changes. Here is how my design (tribals, set 3) looks applied.

I masked out the top part so that it doesn't go over the lips, and I got rid of the tips that stick out beyond the face.

Step 6

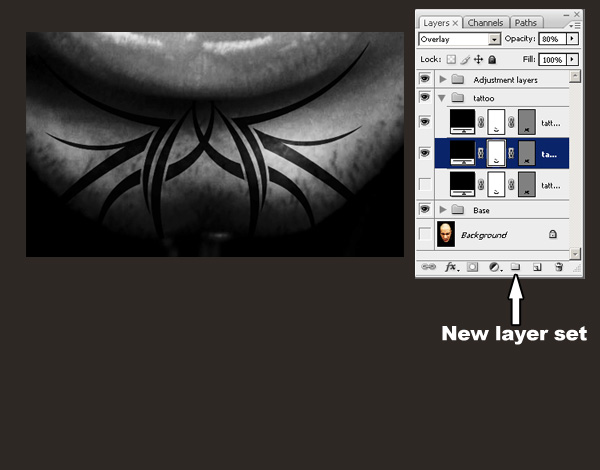
Duplicate the shape layer twice. There now should be a 'tattoo copy' and 'tattoo copy 2'. Set the 'tattoo copy' layer to Overlay at 80% Opacity. Set the 'tattoo copy 2' layer to Soft light at 64% Opacity. Hide the original 'tattoo' layer.

For organizational purposes, I have created several layer sets and dropped my layers into those sets. You can create a layer set by clicking on the icon in your layers palette that is located between the 'new adjustment layer' icon and the 'new layer' icon. Using layer sets will smooth your workflow.

Step 7

Rasterize your 'tattoo copy' layer by right-clicking on it in the layers palette and selecting Rasterize layer. This process will return the blending mode to Normal so we must set the blending mode back to Overlay and the Opacity back to 80%. Now go to Filter > Blur > Gaussian blur and blur the layer with a value of about 2.0 pixels.

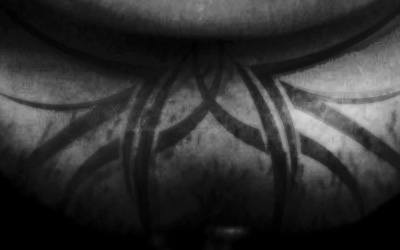
Next, this is where your creative mind steps in. You will have to mask away parts of both 'copy' layers until you have found a satisfying result regarding the opacity of the tattoo. I prefer to use a big brush and alter in between 10 and 20 percent opacity while brushing. Here is how my result looks:

Congratulations, you have just gone beyond the part that is covered in any other tutorial. You have created something that looks more or less real. But we are not done yet.

Step 8

We are almost there--time to apply our displacement map. Select your 'tattoo copy' layer and go to Filter > Distort > Displace. Leave the default settings and hit ok. A window will come up prompting for a psd file. Now navigate to your Displacement.psd file and select it. Select your 'tattoo copy 2' layer and hit Ctrl+F. This will repeat the filter for this layer giving you something similar to this:

Conclusion

I hope that you have learned something from this tutorial and I hope that you understand that it takes a lot of time and effort to make something look real. The best way to achieve such an effect is by experimenting and constantly looking at challenges from a different angle. When I first started doing this it took me about 6-8 hours to get a good balance and to develop this technique.

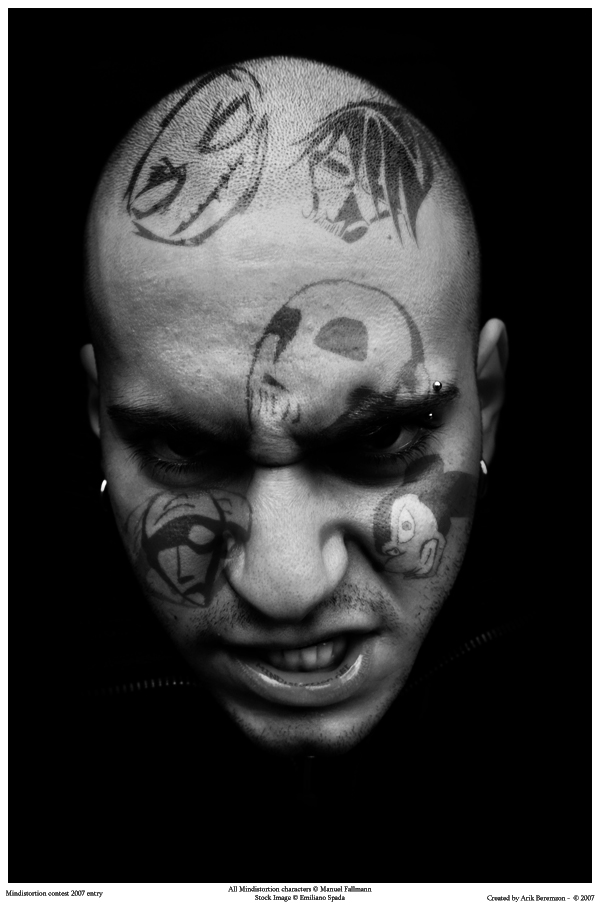
Please note that sometimes the displace filter can have a negative effect. In such cases either do not use it or play around with the opacities of the layer and the Fade Displace option under the Image tab. You will truly achieve great results by playing around. Here is my final product that I submitted to a contest:


No hay comentarios:

Publicar un comentario

Archivo del blog

Seguidores

Visitas

Etiquetas

2007 (1) 2009 (2) 2011 (1) acciones (2) action (2) actor (1) ads (2) advertising (5) aerea (4) aerial (4) africa (2) agua (2) albena markova (1) aleksey marina (1) alemania (1) american photo images (1) amor (3) amsterdam (1) andrew zuckerman (1) andris eglitis (1) angeles times (1) animal (11) anuncios (8) aphoto (10) aplicaciones (1) architecture (1) army (1) arnaud frich (1) arquitectura (1) asia (1) auto (5) avatar (1) aves (1) awards (3) azul (1) back light (1) backgrounds (1) baile (1) barcelona (1) bianca balti (1) bibble (1) bill wadman (1) birds (2) black and white (11) blanco y negro (11) blue (1) boat (1) boda (4) bodas (1) bodegón (8) body paint (2) botellas (1) bottles (1) bp (1) bride (3) brushes (12) bull (1) buque (1) butterfly (1) caballos (1) calendario (3) camión (1) capilla (1) car (4) caratula (1) carrusel (1) cartoon (1) cascada (2) casino (1) castells (1) castillos (2) cat (3) celebrities (1) cementerio (1) cemetery (1) cepillos (1) chateaux (1) children (6) china (1) chino (1) christmas (5) church (1) cielo (1) cindy grundsten (1) circo (1) cirque (1) city (2) ciudad (2) claudia (1) clipart (1) close-up (2) coche (7) colby brown (1) collage (3) collin bogle (1) color (4) colores (2) comic (1) composición (1) conceptual (2) contraluz (1) cookie (1) corán (1) corazón (1) corel (2) cosplay (3) couples (1) creative (11) croacia (1) crucero (1) cs5 (1) cuba (1) cuerpo humano (2) curso (3) dale chihuly (1) dan vojtech (1) dance (1) david lachapelle (1) david leventi (1) deporte (8) desierto (1) design (3) desnudo (22) deutchland (1) devianart (3) dirk wiedlein (1) diseño (3) disney (1) dog (2) dominik kraner (1) douglas latham (1) dreamweaver (1) drew gardner (1) dvd (4) dzoom (1) earth (6) ebooks (2) editor (2) eeuu (2) efecto seda (1) egipt (1) egipto (1) eldar kadimov (1) emoticonos (1) eps (2) eric rousset (1) escocia (1) españa (2) estatua (1) estilo (2) estudio (1) eyes (2) faros (1) fashion (2) felix (1) fifa (1) fight (1) film (1) filter (1) filtro (1) fire (4) fish eye (1) flickr (2) flores (11) flowers (11) fonts (7) football (3) foto antigua (1) foto manipulación (6) fotomix (29) frame (1) france (4) francia (4) fruit (1) fruta (1) fuego (3) fuentes (4) fun (2) futbol (3) gala gankina (1) galerias (1) galletas (1) games (1) gato (3) gene higa (1) gente (4) getty images (12) glamour (1) glass (1) gore (1) graffiti (1) granada (1) grunge (1) guerra (1) haiti (1) halloween (1) hawai (1) hdr (7) henryk (1) hermin abramovitch (1) hollywood (1) holy week (1) hombre (1) horror (2) horses (1) howard schatz (1) human body (2) humo (1) humor (1) iglesia (1) iliko studio (1) iluminación (1) ilustración (1) ilustration (1) india (1) infrared (1) infraroja (1) international (1) invierno (5) islandia (1) italia (1) japan (5) japón (5) jerry skarbakka (1) joy of life (2) kids (1) kilauea (1) lady gaga (1) laini (1) landscape (22) larisa dydorovs (1) las vegas (1) latvia (1) lava (1) layer (1) lego (1) leica (1) letonia (1) light effect (2) lighthouses (1) lighting (1) liliya gorlanova (1) lince (1) linx (1) livejournal (1) lluvia (1) loira (1) loire (1) london (1) londres (1) love (2) luz (2) macro (15) manga (1) map (1) mapa (1) mar (10) marc adamus (1) marca (1) marco (1) maria (1) mariposa (1) marruecos (1) martin loyer (1) mascotas (5) matte painting (2) mattijn franssen (1) medieval (1) megafotografia (1) megaupload (1) metro (1) méxico (1) mezquita (1) michael kai (1) michel gantner (1) micro (4) miss (1) moda (1) model (6) modelo (6) momento (1) moscow (3) moscú (3) mujer (5) mundo (6) munich (1) murat suyur (1) musulmán (1) nasa (1) naturaleza (34) nature (33) navidad (5) nevada (1) new york (1) newsletter (1) night (1) nikon (1) niños (6) nocturna (1) norbert maier (1) novia (3) nude (22) nueva york (1) ocean (3) oil (1) ojo de pez (1) ojos (2) ondas (1) opera (1) otoño (1) oxana zuboff (1) paisaje (21) pájaro (1) panorámica (2) paris (6) parque (1) pasarela (1) patterns (1) pdf (2) pearcing (1) peleng (1) película (2) people (4) perro (2) personalidades (1) perú (1) pesebre (1) pet (5) peter coulson (1) photo editor (4) photo manipulations (5) photofunia (1) photography (1) photomatix (1) photomix (31) photoshop (85) photosight (1) picture (1) pin-up (2) pinceles (11) pinguino (1) pirelli (2) plantillas (3) playa (1) playstation (1) plugin (7) png (1) polaroid (1) portrait (21) powerful mental wave (1) primavera (1) programas (3) psd (4) publicidad (2) pxleyes (1) race (1) rain (2) rapidshare (1) raptor (1) raw (1) rayos x (1) red (4) reglas (1) renault (1) repair (2) reparar (2) retoque (2) retouch (3) retrato (21) reus (1) reuters (3) robado (1) rojo (2) roma (2) rules (1) rusia (9) salou (1) salvaje (2) samin (1) san fermin (1) san petersburgo (2) sand (1) santa (1) scotland (1) scott peck (1) scratches (1) sea (8) seda (1) semana santa (1) sergei bezyaev (1) sexual (1) simon hogsberg (1) skeletalmess (1) sky (1) smileys (1) smoke (1) software (2) sony (1) spain (1) splash (1) sport (9) spots (1) spring (1) st.petersburg (1) statue (1) steve mc.curry (1) still life (10) storm (2) street (2) studio (3) styles (1) sudafrica (1) summer (1) surf (2) tattoo (1) tchaikovski artem (1) tears (1) templates (3) terror (2) terry richardson (1) texturas (4) textures (4) tierra (3) tiger (1) tigre (1) tokyo (2) tombuctú (1) tools (1) tormenta (2) toros (1) torres (1) tortazos (1) travel (1) trucks (1) ttf (2) tunel (1) tutorial (21) underawater (1) urban (1) valentin (5) vancouver (1) vaticano (1) vector (3) verano (1) viaje (1) vida (1) video (4) vidrio (1) vilaseca (1) viona iegelems (1) vladimir fedokto (1) volcan (2) volvo (1) wallpaper (21) wallpapers (1) war (1) water (3) waterfall (2) watermark (1) webs (2) wedding (5) whnpa (1) wild (12) winter (5) woman (6) world (6) x-ray (1) zombie (2) zoo (1)

Datos personales

Mi foto
Fotógrafo aficionado, Puedes ver mis trabajos aquí ... www.josepmaria10.mye.name o también aquí ... www.pinterest.com/tivisano/ . Dispongo de equipo fotográfico profesional así como de un estudio portatil. Si quieres saber más sobre mis sesiones fotográficas, no lo dudes, contacta conmigo a través de un mensaje privado a visualsjm@gmail.com

Mis otros BLOGS

Uno de mis otros blogs y SOLO con fotografías propias (de libre uso nombrándome como autor de las mismas y sino es con ánimo comercial) ... www.lafotografiadejosepmaria.blogspot.com

Otro de mis blogs, esta vez con más cositas cuando mi tiempo libre me lo permite, noticias, fotos de mi autoria, tutoriales, etc. ... Mi fotoblog

La Banda Sonora de este BLOG


ir arriba